IT2810: Web Development
Course overview
The course covers technologies and methods used in the development of web-based solutions. Through various projects, the students will learn about frameworks, architectures, languages, formats and standards used in the development of web-applications and services. The course is technology-oriented and it is the achieved level of knowledge and skills that is evaluated in the projects and assignments.
Introduction
While the course overview explains the contents of the course, it does not explain why. One interpretation of why is that the course gives a brief introduction into the life of a "full stack developer"
Varying definitions of this title exist: from a developer specialized in everything from front-end to back-end; to a developer who has a general knowledge in all steps from concept to finished product; to a fictional figure with a virtually unattainable skill set.
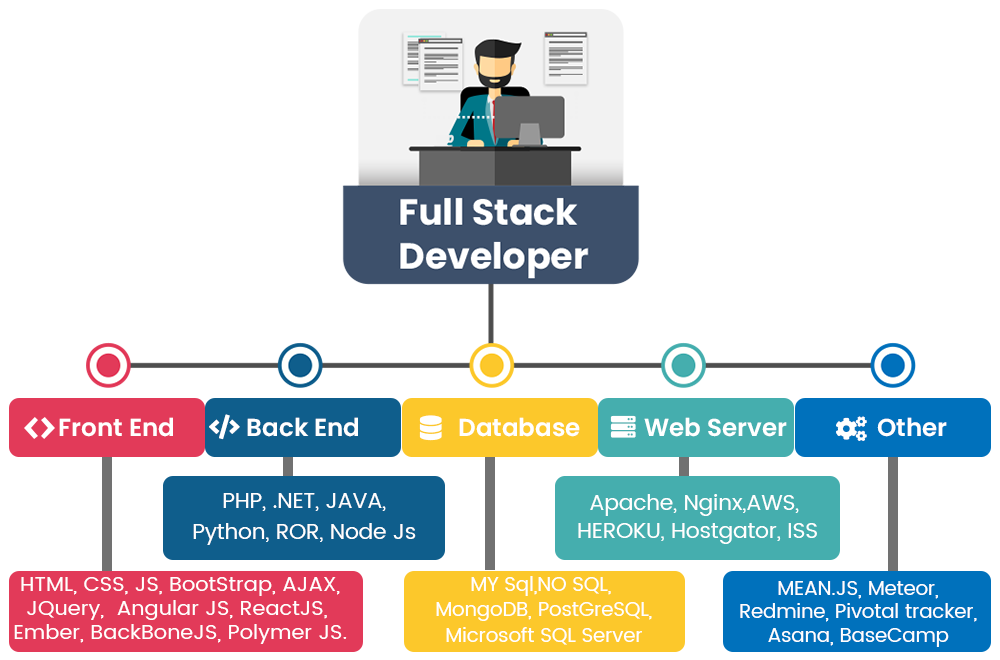
Full-stack die-hards would consider a full-stack developer to have specialized knowledge in all stages of software development. Thus, a full-stack developer would be proficient, if not fluent, in:
- Front-end web development using HTML, CSS and JavaScript (IT2805)
- Server, network, and hosting environment (TTM4100)
- Relational and nonrelational databases (TDT4145)
- How to interact with APIs and the external world
- User interface and user experience (TDT4180)
- Quality assurance
- Security concerns throughout the program (TTM4185, TTM4135/TDT4237)
- Understanding customer and business needs (TDT4113/IT1901)
Is this possible in Web 2.0? Naysayers argue that with the increasingly diverse aspects of web development, it’s virtually impossible to be a true full-stack developer. Frankly, it may not even be practical to do so.
Others are of the opinion that a full-stack developer is simply someone who is familiar with all layers in computer software development. These developers aren’t experts at everything; they simply have a functional knowledge and ability to take a concept and turn it into a finished product. Such gurus make building software much easier as they understand how everything works from top to bottom and can anticipate problems accordingly. This is the most realistic definition of a full-stack developer.
Clearly, it takes years of work experience in different languages, roles, and industries to reach this level of qualification. Because of this, full stack developers are few and far between, making those who exist very employable and in-demand.
One broad interpretation is that this course is the culimination of what you have learned during the 2 first years studying Informatics/Computer Science.
To summarize this wikipendium article will ble split in three major pieces; the first will focus on front end, the second back end, while in the last part we will briefly look into testing.
Frontend
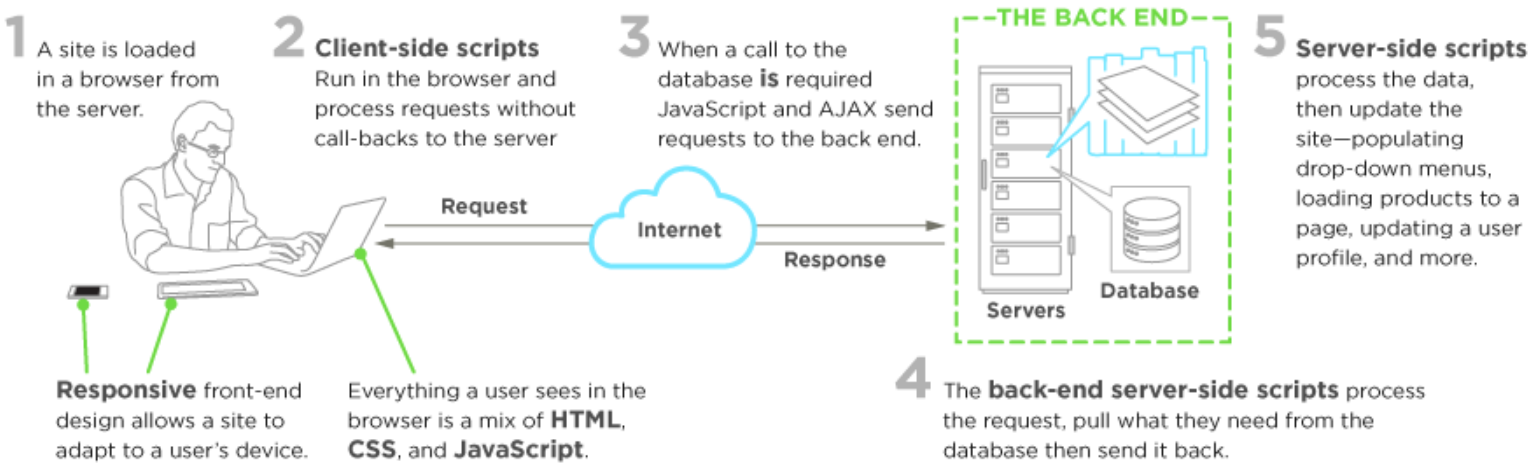
Front-end web development, also known as client-side development is the practice of producing HTML, CSS and JavaScript for a website or Web Application so that a user can see and interact with them directly. The challenge associated with front end development is that the tools and techniques used to create the front end of a website change constantly and so the developer needs to constantly be aware of how the field is developing.
The objective of designing a site is to ensure that when the users open up the site they see the information in a format that is easy to read and relevant. This is further complicated by the fact that users now use a large variety of devices with varying screen sizes and resolutions thus forcing the designer to take into consideration these aspects when designing the site. They need to ensure that their site comes up correctly in different browsers (cross-browser), different operating systems (cross-platform) and different devices (cross-device), which requires careful planning on the side of the developer.
A front-end developer architects and develops websites and applications using web technologies (i.e., HTML, CSS, DOM, and JavaScript), which run on the Open Web Platform or act as compilation input for non-web platform environments (i.e., React Native).
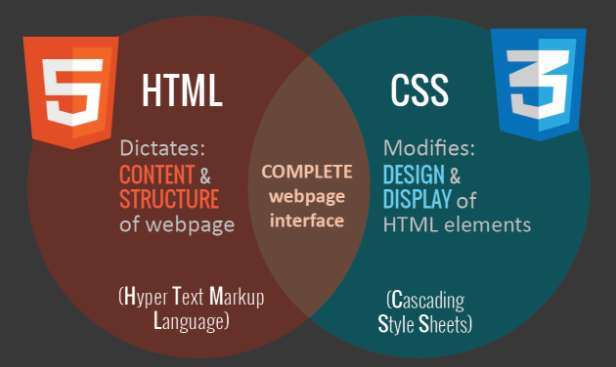
HTML and CSS.
CSS-grid and CSS-flexbox
CSS-flexbox and CSS-grid are techniques that makes organising the content of a webpage easier. They are used by creating rules for how boxes with content fill and share the space inside a container object. Flexbox is a simple one dimentional solution that lets you choose an orientation and arrange the boxes according to your spesifications. Grid is a two dimentional solution based on defining how rows and coloms should be displayed. For more in-depth instructions check out Flexbox and Grid
HTML5 - Canvas
Canvas elements are used to display graphics on a webpage. The <canvas> element itself is just a container, this container can be filled using JavaScript. When the canvas is filled the information used to fill it is not stored in the DOM, and any objects defined in the .js file cannot be referenced by the browser.
SVG
SVG stands for Scalable Vector Graphics and is a tool for displaying graphics on a webpage. SVG differs from the canvas element in that it's possible to define the graphics in the SVG element in your HTML-file. The elements created are available in the DOM and are stored as objects that can be referenced.
JavaScript
![]()
The story so far: In the beginning JavaScript was created. This has made a lot of people very angry and been widely regarded as a bad move.
You can either love, hate or be totally confused by Javascript. However, there is no denying that Javascript is one of the most popular languages in the world, despite its deeply ingrained issues.
So why is Javascript still being used? Two words: "Browser Support". Javascript is interpreted by the web browser, so if we were to use a different client-side scripting language, every browser would have to implement support for it. Obviously some browsers would lag behind others and developers would avoid using the language because only a fraction of their potential users would be able to use their application. So, as you can see, there are considerable economic impediments to using anything other than Javascript (or even a newer version of JavaScript).
Note: you should use some form of Style Guide.
What is ES6, ES8, ES 2017, ECMAScript ...?
Here’s what happened long, long ago:
- JavaScript was originally named JavaScript in hopes of capitalizing on the success of Java.
- Netscape then submitted JavaScript to ECMA International for Standardization. (ECMA is an organization that standardizes information)
- This results in a new language standard, known as ECMAScript.
Put simply, ECMAScript is a standard. While JavaScript is the most popular implementation of that standard. JavaScript implements ECMAScript and builds on top of it.
ES is simply short for ECMAScript. Every time you see ES followed by a number, it is referencing an edition of ECMAScript. In fact, there are eight editions of ECMAScript published.
ES1: June 1997 — ES2: June 1998 — ES3: Dec. 1999 — ES4: Abandoned ES5: 2009 — ES6 / ES2015: 2015
ES6 was the popularized name prior to release. However, the committee that oversees ECMAScript specifications made the decision to move to annual updates. With this change, the edition was renamed to ES 2015 to reflect the year of release. Subsequent releases will therefor also be named according to the year they are released.
ES6
While ES6 by far is not the newest JavaScript version it was revolutionary when it came out and defined the feautures we today associate with Javascript.
var-let-const and block scopes
ES6 specification introduced two new ways of declaring variables in JavaScript with let and const keyword.
Let’s start with let keyword. This keyword enables us to declare block scoped local variables. And to give you an example :
function foo() {
  var a = 5;
  while (a < 6) {
    let b = a + 3;
    console.log(b);  //logs 8
    a += 1;
  }
  console.log(a);  //logs 6
  console.log(b);  // throws ReferenceError: b is not defined
}

foo();
Inside of the while loop on line 4 we are declaring new variable using let keyword and this variable has block inside of the while loop for its scope. For this reason line 5 logs number 8 to the console and line 9 throws ReferenceError since our variable b is no longer available in this “higher” scope.
If you declare variable with let keyword in a global scope it will be available in all lower scopes.
let b = 3;

function foo() {
  var a = 5;

  while (a < 6) {
    b = a + 3; //notice that b is available here
    console.log(b); // logs 8;
    a += 1;
  }
  console.log(a); //logs 6
  console.log(b); //logs 8
}
foo();
Now let’s look at const keyword. It enables us to create block scoped variables just like let word does or as it is defined on MDN : “This declaration creates a constant whose scope can be either global or local to the block in which it is declared”.
So, we know that const is creating a constant so, what do you think the code below will log:
const x = [1, 2, 3];
x[0] = 'a';
console.log(x);
Have you tried to answer it ? If your answer was [1, 2, 3] you were wrong. This code actually logs [’a’, 2, 3] Wait what? How can this be possible, isn’t it a case that value inside of the constant can’t be altered? Well no, constant is a variable that can’t be reassigned. It has nothing to do with value. Or as we can see in example below :
const x = [1, 2, 3];
x = [1, 2]
console.log(x); // throws TypeError: Assignment to constant variable.
When to use it? Wherever you were already using uppercase variable names i.e. var PI = 3.14; start using const. It makes sense since these variables are not intended to be reassigned later. As Kyle Simpson said in his book You don’t know JS :
Essentially,
constdeclarations enforce what we've stylistically signaled with our code for years, where we declared a variable name of all uppercase letters and assigned it some literal value that we took care never to change.
One of the more popular style guides is Airbnb JavaScript Style Guide. In it, it is stated that you should primarily use const to create variables, and when you intend to reassign them somewhere in the code then use let and avoid using var keyword to create variables completely.
Arrow functions
Arrow functions – also called “fat arrow” functions, from CoffeeScript (a transcompiled language) — are a more concise syntax for writing function expressions. They utilize a new token, =>, that looks like a fat arrow. Arrow functions are anonymous and change the way this binds in functions.
Using arrows functions in ES6 allows us to stop using that = this or self = this or _this = this or .bind(this). For example, this code in ES5:
var _this = this;
$('.btn').click(function(event){
  _this.sendData()
});
is far less pretty than the ES6 variant
$('.btn').click(event => this.sendData());
Here’s another example in which we use call to pass the context to the logUpperCase() function in ES5:
var logUpperCase = function() {
  var _this = this

  this.string = this.string.toUpperCase()
  return function () {
    return console.log(_this.string)
  }
}

logUpperCase.call({ string: 'es6 rocks' })()
While in ES6, we don’t need to mess around with _this:
var logUpperCase = function() {
  this.string = this.string.toUpperCase()
  return () => console.log(this.string)
}

logUpperCase.call({ string: 'es6 rocks' })()
When an arrow function is used with one line statement, it becomes an expression, i.e,. it will implicitly return the result of that single statement. If you have more than one line, then you’ll need to use return explicitly.
// This ES5 code is creating an array from the messages array:
var ids = ['5632953c4e345e145fdf2df8','563295464e345e145fdf2df9']
var messages = ids.map(function (value) {
  return "ID is " + value // explicit return
})

// Will become this in ES6:
var ids = ['5632953c4e345e145fdf2df8','563295464e345e145fdf2df9']
var messages = ids.map(value => `ID is ${value}`) // implicit return
The parenthesis () are optional for single params in an arrow function
signature. You need them when you use more than one parameter.
.map(), .reduce(), and .filter()
.map(). Say you have received an array containing multiple objects – each one representing a person. The thing you really need in the end, though, is an array containing only the id of each person.
// What you have
var officers = [
  { id: 20, name: 'Captain Piett' },
  { id: 24, name: 'General Veers' },
  { id: 56, name: 'Admiral Ozzel' },
  { id: 88, name: 'Commander Jerjerrod' }
];
// What you need
[20, 24, 56, 88]
There are multiple ways to achieve this. You might want to do it by creating an
empty array, then using .forEach(), .for(...of), or a simple .for() to meet your goal. Using .forEach()
var officersIds = [];
officers.forEach(function (officer) {
  officersIds.push(officer.id);
});
Notice how you have to create an empty array beforehand? Let’s see what it looks like when using .map() and arrow functions:
const officersIds = officers.map(officer => officer.id);
So how does .map() work? Basically is takes 2 arguments, a callback and an optional context (will be considered as this in the callback). The callback runs for each value in the array and returns each new value in the resulting array.
.reduce(). Just like .map(), .reduce() also runs a callback for each element of an array.
What's different here is that reduce passes the result of this callback (the accumulator) from one array element to the other.
Say you have an array with these pilots and their respective years of experience:
var pilots = [
  {
    id: 10,
    name: "Poe Dameron",
    years: 14,
  },
  {
    id: 2,
    name: "Temmin 'Snap' Wexley",
    years: 30,
  },
  {
    id: 41,
    name: "Tallissan Lintra",
    years: 16,
  },
  {
    id: 99,
    name: "Ello Asty",
    years: 22,
  }
];
Getting to know the total years of experience of all of them with .reduce() is pretty straightforward:
const totalYears = pilots.reduce((acc, pilot) => acc + pilot.years, 0);
.filter(). What if you have an array, but only want some of the elements in it? That’s where .filter() comes in!
var pilots = [
  {
    id: 2,
    name: "Wedge Antilles",
    faction: "Rebels",
  },
  {
    id: 8,
    name: "Ciena Ree",
    faction: "Empire",
  },
  {
    id: 40,
    name: "Iden Versio",
    faction: "Empire",
  },
  {
    id: 66,
    name: "Thane Kyrell",
    faction: "Rebels",
  }
];
Say we want to split pilots in two arrays, Rebels and Empire. Using .filter() makes this simple:
const rebels = pilots.filter(pilot => pilot.faction === "Rebels");
const empire = pilots.filter(pilot => pilot.faction === "Empire");
How simple! Basically, if the callback function returns true, the current element will be in the resulting array. If it returns false, it won't be.
Note that none of these functions modify the original array, returning a modified copy of the array instead.
Classes and inheritance
This example is taken from javascript.info, read there if you want a more detailed and extended introduction to classes and inheritance, or see here for a more lighthearted intro.
Classes can extend one another. There's a nice syntax, technically based on the prototypal inheritance.
To inherit from another class, we should specify "extends" and the parent class before the brackets {..}.
Here Rabbit inherits from Animal:
class Animal {

  constructor(name) {
    this.speed = 0;
    this.name = name;
  }

  run(speed) {
    this.speed += speed;
    alert(`${this.name} runs with speed ${this.speed}.`);
  }

  stop() {
    this.speed = 0;
    alert(`${this.name} stopped.`);
  }

}

// Inherit from Animal
class Rabbit extends Animal {
  hide() {
    alert(`${this.name} hides!`);
  }
}

let rabbit = new Rabbit("White Rabbit");

rabbit.run(5); // White Rabbit runs with speed 5.
rabbit.hide(); // White Rabbit hides!
The extends keyword actually adds a [[Prototype]] reference
from Rabbit.prototype to Animal.prototype, just as you expect it to be, and as we've seen before.
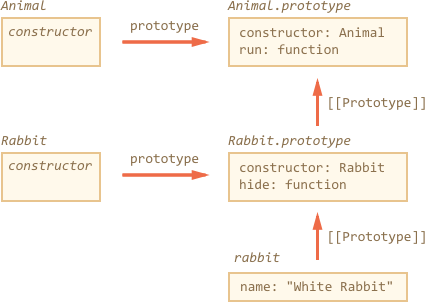
So now rabbit has access both to its own methods and to methods of Animal.
Overridng a method. Now let’s move forward and override a method. As of now, Rabbit inherits the stop method that sets this.speed = 0 from Animal.
If we specify our own stop in Rabbit, then it will be used instead, but usually we don’t want to totally replace a parent method, but rather to build on top of it, tweak or extend its functionality. We do something in our method, but call the parent method before/after it or in the process.
Classes provide "super" keyword for that.
super.method(...)to call a parent method.super(...)to call a parent constructor (inside our constructor only).
For instance, let our rabbit autohide when stopped:
class Rabbit extends Animal {
  hide() {
    alert(`${this.name} hides!`);
  }

  stop() {
    super.stop(); // call parent stop
    this.hide(); // and then hide
  }
}

let rabbit = new Rabbit("White Rabbit");

rabbit.run(5); // White Rabbit runs with speed 5.
rabbit.stop(); // White Rabbit stopped. White rabbit hides!
If you want to learn more about the intrinsic properties of "super" and "extends" another good source can be found here.
Modules, imports and exports
Anyone starting web development a few years ago would have been shocked to discover there was no concept of modules in JavaScript.
It was impossible to directly reference or include one JavaScript file in another. Developers therefore resorted to alternative options. Like having
multiple HTML <script> Tags.
<script src="lib1.js"></script>
<script src="lib2.js"></script>
<script src="core.js"></script>
<script>
console.log('inline code');
</script>
The average web page in 2018 uses 25 separate scripts, yet it’s not a practical solution:
- Each script initiates a new HTTP request, which affects page performance. HTTP/2 alleviates the issue to some extent, but it doesn’t help scripts referenced on other domains such as a CDN.
- Every script halts further processing while it’s run.
- Dependency management is a manual process. In the code above, if
lib1.jsreferenced code inlib2.js, the code would fail because it had not been loaded. That could break further JavaScript processing. - Functions can override others unless appropriate module patterns are used. Early JavaScript libraries were notorious for using global function names or overriding native methods.
A plethora of different options were introduced to tackle the problems above, but they all had their drawbacks. A single, native module standard was therefore proposed in ES6 (ES2015).
Everything inside an ES6 module is private by default, and runs in strict mode (there’s no need for 'use strict'). Public variables, functions and classes are exposed using export. For example:
// lib.js
const PI = 3.1415926;

function sum(...args) {
  log('sum', args);
  return args.reduce((num, tot) => tot + num);
}

function mult(...args) {
  log('mult', args);
  return args.reduce((num, tot) => tot * num);
}

// private function
function log(...msg) {
  console.log(...msg);
}

export { PI, sum, mult };
import is then used to pull items from a module into another script or module:
import { sum as addAll, mult as multiplyAll } from './lib.js';

console.log( addAll(1,2,3,4) );      // 10
console.log( multiplyAll(1,2,3,4) ); // 24
In this case, lib.js is in the same folder as main.js. Absolute file references (starting with /), relative file references (starting ./ or ../) or full URLs can be used. Note that multiple items can be imported at one time and imports can be aliased to resolve naming collisions.
Finally, all public items can be imported by providing a namespace:
import * as lib from './lib.js';

console.log( lib.PI );            // 3.1415926
console.log( lib.add(1,2,3,4) );  // 10
console.log( lib.mult(1,2,3,4) ); // 24
Promises and asynchronee call's
Let's consider a rather trivial example of a delayed asynchronous execution with setTimeout():
setTimeout(function(){
  console.log('Yay!')
}, 1000)
We can re-write the code in ES6 with Promise:
var wait1000 =  new Promise(function(resolve, reject) {
  setTimeout(resolve, 1000)
}).then(function() {
  console.log('Yay!')
})
Or with ES6 arrow functions:
var wait1000 =  new Promise((resolve, reject)=> {
  setTimeout(resolve, 1000)
}).then(()=> {
  console.log('Yay!')
})
So far, we’ve increased the number of lines of code from three to five without any obvious benefit. That’s right. The benefit will come if we have more nested logic inside of the setTimeout() callback:
setTimeout(function(){
    console.log('Yay!')
    setTimeout(function(){
        console.log('Wheeyee!')
    }, 1000)
}, 1000)
Can be re-written with ES6 promises:
var wait1000 =  ()=> new Promise((resolve, reject)=> {setTimeout(resolve, 1000)})

wait1000()
    then(function() {
        console.log('Yay!')
        return wait1000()
    })
    .then(function() {
        console.log('Wheeyee!')
    })
Still not convinced that Promises are better than regular callbacks? Me neither. I think once you got the idea of callbacks and wrap your head around them, then there’s no need for additional complexity of promises.
Nevertheless, ES6 has Promises for those of you who adore them. Promises have a fail-and-catch-all callback as well which is a nice feature. Take a look at this post for more info on promises: Introduction to ES6 Promises.
JavaScript UI frameworks
A JavaScript framework is an application framework written in JavaScript. It differs from a JavaScript library in its control flow: a library offers functions to be called by its parent code, whereas a framework defines the entire application design. A developer does not call a framework; instead it is the framework that will call and use the code in some particular way. Some JavaScript frameworks follow the model-view-controller paradigm designed to segregate a web application into orthogonal units to improve code quality and maintainability. Examples: AngularJS, Ember.js, Meteor.js, React.js.
A noted by Ian Allen these JavaScript frameworks often have a brutal lifecycle. So it is a good idea to know how to write JavaScript well before jumping into the latest trendy runway sensation framework.
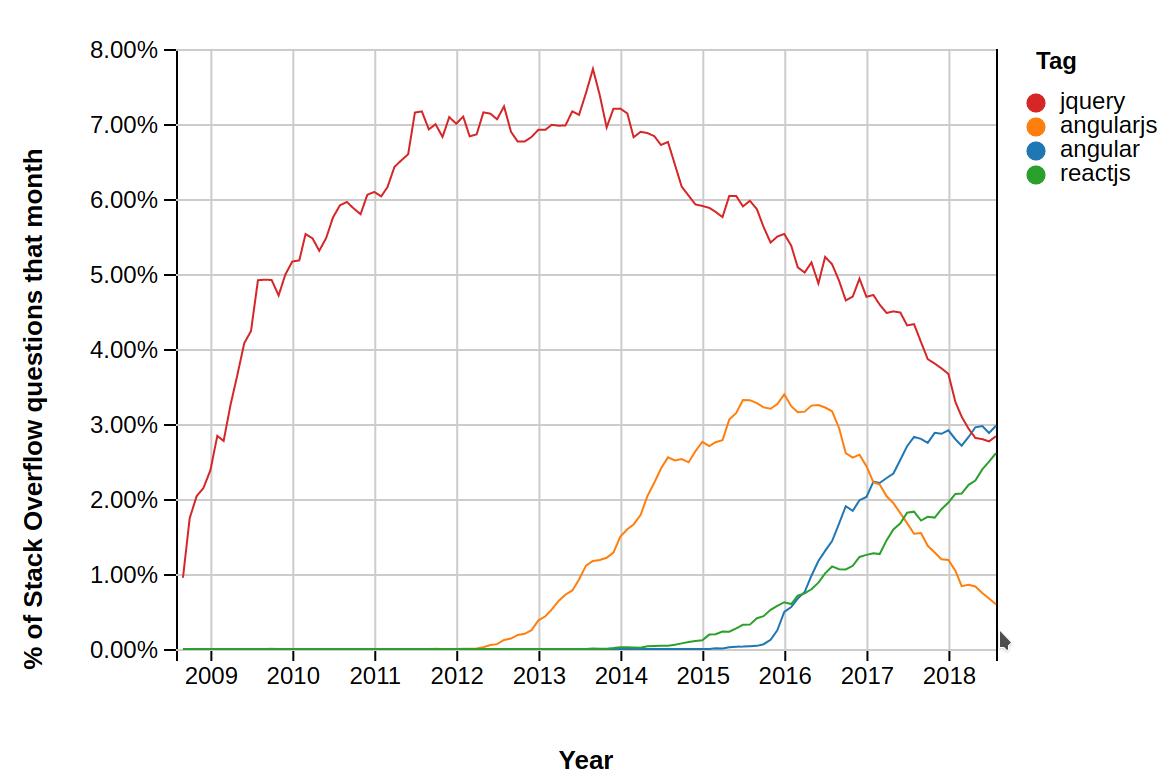
jQuery

jQuery is a lightweight, "write less, do more", JavaScript library. The library contains the following features:
- HTML/DOM manipulation
- CSS manipulation
- HTML event methods
- Effects and animations
- AJAX
- Utilities
While there is nothing inherently wrong with using jQuery today, it was much more relevant 10 years ago. jQuery made it simple to manipulate the DOM, define animations, and make “AJAX” requests— basically, it enabled web developers to create more modern, dynamic experiences that stood out from the rest. Most importantly of all, the JavaScript features built in one browser with jQuery would generally work in other browsers, too.
As of today, you have a lot more tools that you can use which will make a better and faster job than what jQuery does in most of the cases, and if your project doesn’t require too much functionality then vanilla JS could do the work just fine. Even GitHub has removed jQuery completely from their frontend and mentions a handful of reasons why:
- The
$(selector)pattern can easily be replaced withquerySelectorAll(); - CSS classname switching can now be achieved using Element.classList;
- CSS now supports defining visual animations in stylesheets rather than in JavaScript;
$.ajaxrequests can be performed using the Fetch Standard;- The
addEventListener()interface is stable enough for cross-platform use; - We could easily encapsulate the event delegation pattern with a lightweight library;
- Some syntactic sugar that jQuery provides has become reduntant with the evolution of JavaScript language.
One big advantage that jQuery still has is that it is a very popular library, so if you are loading the script from a CDN, then it’s highly likely that the user will use an already cached version of jQuery on your site, and it wont be downloaded again.
React

ReactJS is an open-source JavaScript library which is used for building user interfaces specifically for single page applications. It’s used for handling view layer for web and mobile apps. React also allows us to create reusable UI components. React was first created by Jordan Walke, a software engineer working for Facebook. React first deployed on Facebook’s newsfeed in 2011 and on Instagram.com in 2012.
Best practices
While knowing how components work and how to handle state, it somehows hides the bigger picture. How do you actually start designing a React application? One good source of information is from the documentation itself: Thinking in React. Below are some excellent sources for React:
A far more comprehensible and perhaps a litte daunting list can be found here.
Components
The most important concept to understand in React.js is the component. A React component can be one of two types. It can be either a function component or a class component. Sometimes you will hear different terms to describe these two types, like stateless and stateful. Function components are also often associated with the presentational concept. We will refer to them as function components and class components.
A function component is the simplest form of a React component. These components have no state and no methods. They’re pure, and easy to reason about. Use them as often as possible.
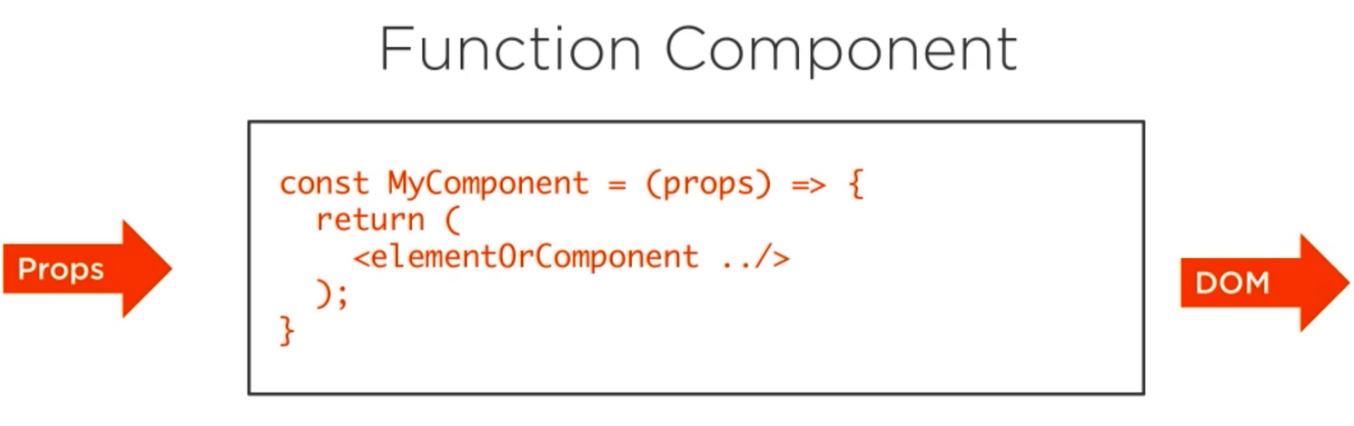
The function component receives an object of properties which is usually named props. It returns what looks like HTML, but is really a special JavaScript syntax called JSX.
A class component is a more featured way to define a React component. It also acts like a function that receives props, but that function also considers a private internal state as additional input that controls the returned JSX.
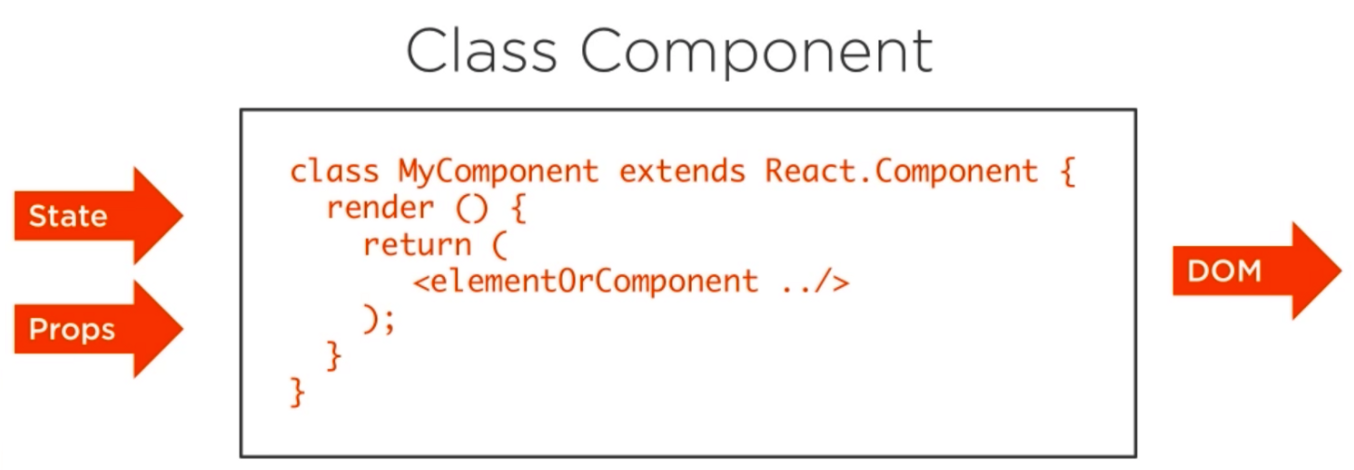
This private internal state is what gives React its reactive nature. When the state of a class component changes, React will re-render that component in the browser.
Components Lifecycle
Each component has several “lifecycle methods” that you can override to run code at particular times in the process.
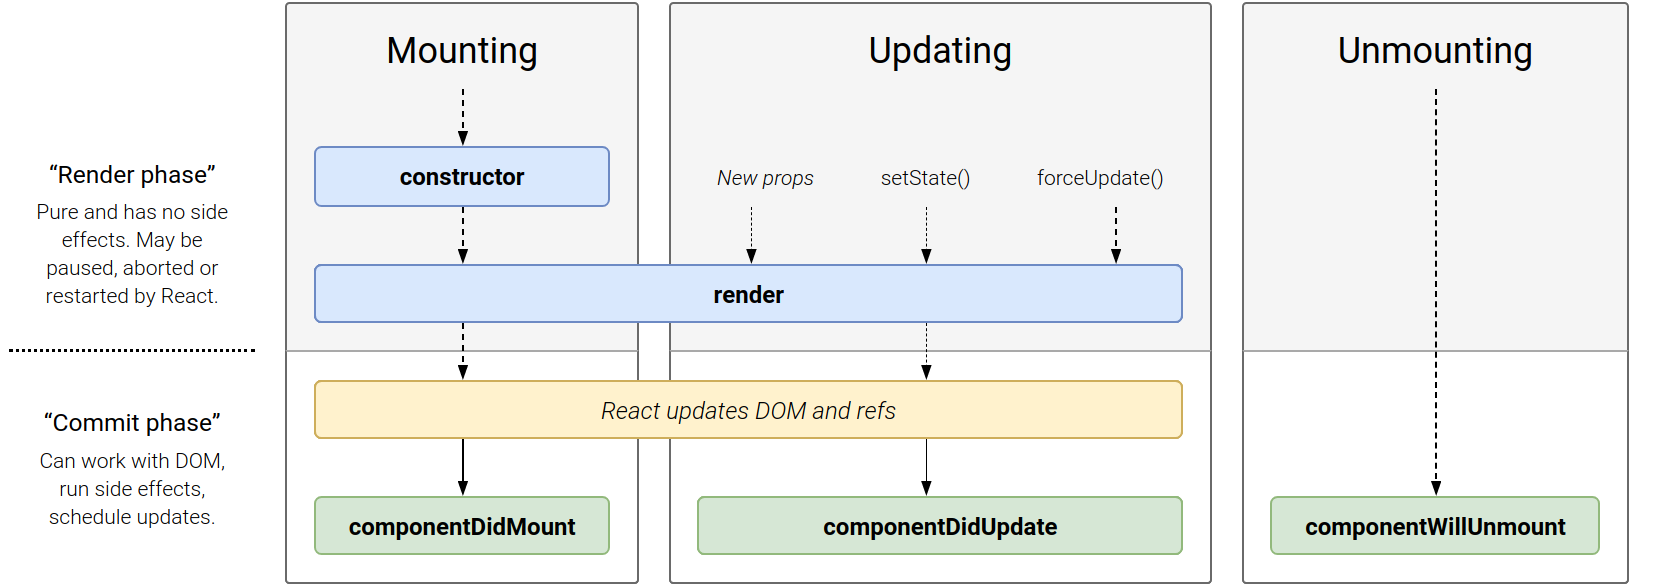
In the list below, commonly used lifecycle methods are marked as bold. The rest of them exist for relatively rare use cases.
Mounting. These methods are called in the following order when an instance of a component is being created and inserted into the DOM:
Update. An update can be caused by changes to props or state. These methods are called in the following order when a component is being re-rendered:
- static getDerivedStateFromProps()
- shouldComponentUpdate()
- render()
- getSnapshotBeforeUpdate()
- componentDidUpdate()
Unmounting. This method is called when a component is being removed from the DOM:
In React, instead of using regular JavaScript for templating, it uses JSX. JSX is simple JavaScript which allows HTML quoting and uses these HTML tag syntax to render subcomponents. HTML syntax is processed into JavaScript calls of React Framework. We can also write in pure old JavaScript.
Let’s look at an actual example of a component. A very simple one, without any input and with a simple h1 in a div output.
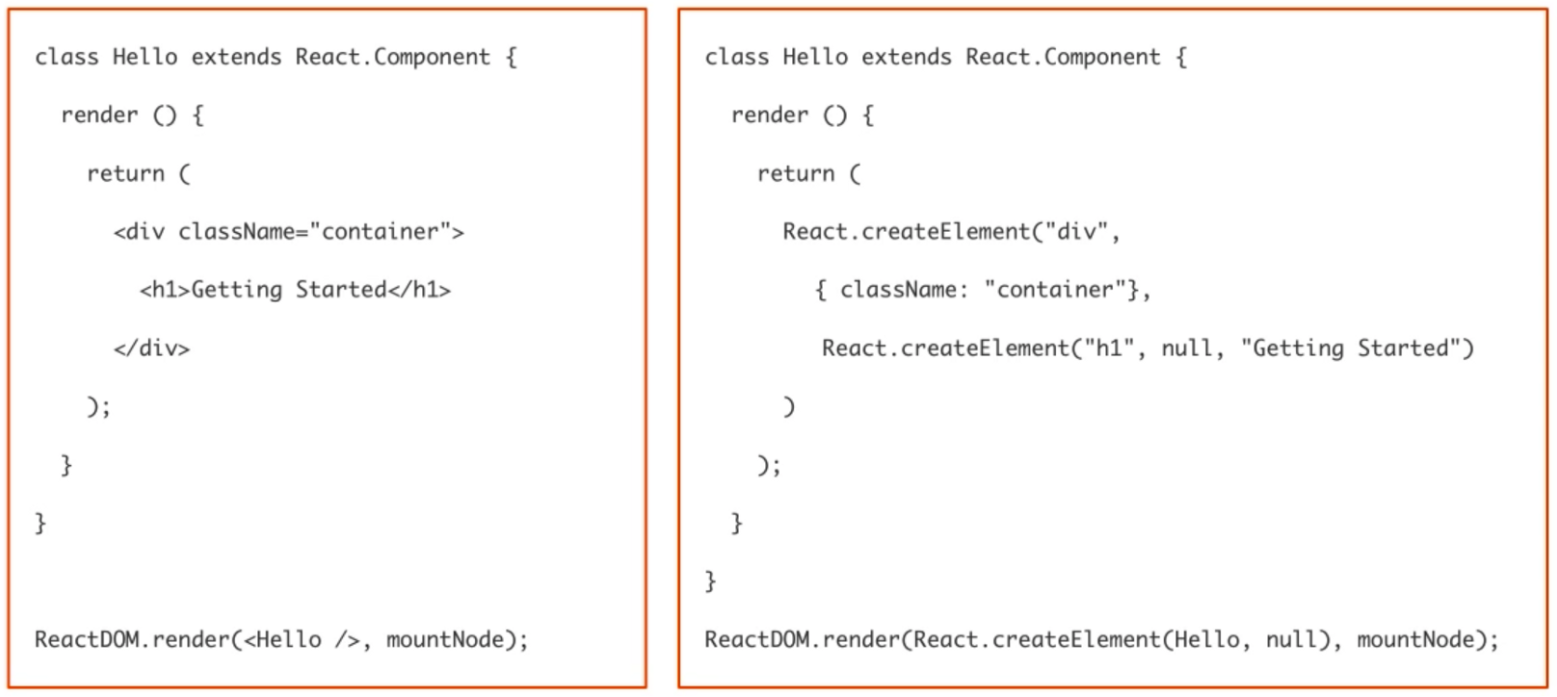
On the left side, the component is written in the special JSX syntax.
Composition − React team suggests to use a single responsibility principle. This means that one component should only be responsible for a single functionality. If some of the components have more than one functionality, we should refactor and create a new component for every functionality.
Props and State
Props are short for Properties. The simple rule of thumb is props should not be changed. In the programming world we call it “Immutable ” or in simple english “Unchangeable”.
Props are Unchangeable — Immutable
import React, {Component} from 'react'
class Topic extends Component {
   render{
     return(
      <div>
        {this.props.name}
      </div>
    )
   }
}
One of the most important features of props is that they can be passed by a parent component to its child components. These props should not be modified inside the component.In React and React Native the data flows in one direction -> From the parent to the child. This allows us to create a component that can be customised with a new set of props every time we use it.
import React, {Component} from 'react'
class Welcome extends Component {
   render{
     return(
      <div>
        <p> Welcome to React, today you will learn: </p>
        <Topic name="Props"/>
        <Topic name="State"/>
      </div>
    )
   }
}
The PropTypes should always be defined. This will help is track all props in the app and
it will also be useful for any developer working on the same project. While Component cannot
directly modify any properties, it can pass a call back function with help of which we
can do modifications. This complete process is known as “properties flow down; actions flow up”.

Props are passed to the component and are fixed throughout its lifecycle. But there are cases when we want to use data that we know is going to change overtime. In this case we use something called state.
State works differently when compared to props. State is internal to a component, while props are passed to a component.
State can Change — Mutable
In english the ‘state of a being’ refers to the physical condition of a person, and it is a mere state, which changes over time. Well, similarly state in React/React Native is used within components to keep track of information.
Keep in mind not to update state directly using this.state. Always use setState to update the state objects. Using setState re-renders the component and all the child components. This is great, because you don’t have to worry about writing event handlers like other languages.
So when can state be used?
Anytime there is data that is going to change within a component, state can be used.
Component’s state is initialized inside a constructor:
class Counter extends Component{

  constructor(props){
    super(props);
    this.state = {counter: 0}
  }
  render(){
    return(
      <p>{this.state.counter}</p>
  )
}
And can be changed later using inbuilt setState() function.
class Counter extends Component{

  constructor(props){
    super(props);
    this.state = {counter: 0}
    this.increment = this.increment.bind(this);
  }
  increment(){
    this.setState({counter: this.state.counter + 1})
  }
render(){
    return(
      <button onClick={this.increment}>Like</button>
      <p>{this.state.counter}</p>
  )
}
While state can be used whenever data is going to change within a component, it should be avoided as much as possible. It is a good practice to centralize the state and pass it down the component tree as props. Whenever we have a group of components that need the same data, we should set a container element around them that will hold the state. Below is a short list of best practices for working with state:
- If a component does not own a datum, then that datum should not influence it’s state.
- Store the simplest possible values to describe a component’s state.
- Leave calculations and conditionals to the render function.
Async calls
Responsive web design
Why do we need Babel?
babel-loader is the Webpack loader responsible for taking in the ES6 code and making it understandable by the browser of choice.
React components are mostly written in JavaScript ES6. ES6 is a nice improvement over the language but older browsers cannot understand the new syntax. Take the class keyword for example. Stateful React components are declared as classes. So for getting ES6 to work in older browser some kind of transformation is needed.
And that transformation is called transpiling. Webpack doesn’t know how to transform ES6 JavaScript to ES5 but it has this concept of loaders: think of them as of transformers. A webpack loader takes something as the input and produces something else as the output. The most common loader is the babel-loader, which obviously makes use of Babel.
Babel must be configured to use a bunch of presets:
- babel-core: Well as the name suggests the main engine of babel plugin for its dependents to work.
- babel-preset-env: For compiling Javascript ES6 code down to ES5 (please note that babel-preset-es2015 is now deprecated)
- babel-preset-react: For compiling JSX and other stuff down to Javascript
- babel-loader: Consider this as a bridge of communication between Webpack and Babel
If you’re curious to see more examples of how JSX is converted to JavaScript, you can try out the online Babel compiler.
Why do we need Webpack?
Well we don’t necessarily need webpack to work with React, other alternatives could be Browserify, Parsel, Brunch, etc. However, webpack is most widely used and an accepted module bundler and task runner through out React.js community. You will find solutions to most of the problems related to it, its community is vibrant. Also its quite easy and minimal. So why not Webpack. We need its packages for following reasons:
- webpack: The main webpack plugin as an engine for its dependents.
- webpack-cli: To access some webpack commands through CLI like starting dev server, creating production build, etc.
- webpack-dev-server: A minimal server for client-side development purpose only.
- html-webpack-plugin: Will help in creating HTML templates for our application.
You don’t need to memorize all those plugins, just go through it once and understand what they do.
React-native
React has native libraries which were announced by Facebook in 2015, which provides the react architecture to native applications like IOS, Android and UPD. By using React-native you can create cross-platform application while writing the code only once.
AsyncStorage
AsyncStorage is an unencrypted, asynchronous, persistent, key-value storage system that is global to the app. On iOS, AsyncStorage is backed by native code that stores small values in a serialized dictionary and larger values in seperate files. On, Android, AsyncStorage will either use a RocksDB or SQLite based solution depending on whats available.
This is how you import AsyncStorage using ES6 syntax.
import { AsyncStorage } from "react-native"
To save data:
storeData = async (value) => {
  try {
    await AsyncStorage.setItem("key",value);
  } catch(e) {
    console.error(e);
  }
}
To load data:
loadData = async () => {
   try {
     const value = await AsyncStorage.getItems("key");
     if (value) {
       console.log(value);
     }
   } catch(e) {
     console.error(e)
   }
}
You have different methods you could use:
-
getItem -
setItem -
removeItem -
mergeItem -
clear -
getAllKeys -
flushGetRequests -
multiGet -
multiSet -
multiRemove -
multiMerge
State management
Redux
Redux is a predictable state container for JavaScript apps. It makes it easy to manage the state of your application, that is: it helps you manage the data you display and how you respond to user actions. Mutations and Asynchrounous operations are like the development version of Coke and Mentos. When our applications increases in complexity, every features makes it more challenging to think about how our Views and Models interact. It makes it hard to keep track of the state as our application grows larger. Therefore the developers of Redux, Facebook, uses the concept of uni-directional data flow. The application has a central or root state. The change of state triggers the correct Views to update. And only special functions can update the state. A user interaction triggers these special, state-changing-functions, which can only change one thing at the time.
The state of your whole application is stored in an object tree withing a single store. The state of all the components of your application is dependent on this single tree. This makes the application easier to comprehend as a whole. Also debugging becomes easier and persistance and fetching of state becomes more trivial.
To change a state one needs to set of an action, that is an object that describes the changes and what happened. The Views cannot change the state directly. In Redux you dispatch actions that tells another function, called a reducer, that updates the state. You should not mutate the state, but actions should instruct reducers to replace the existing state with a new version.
The reducers should be pure components, it should not mutate the state. The function takes the current state and an action and returns a new state. It always returns the same output for a set of arguments.
Store
The store is the heart of Redux. To create a store:
import { createStore } from 'redux';
import reducer from './reducer';

const store = createStore(reducer);
The store is an object that holds the current state of the application. Redux uses a single store for the entire application. Redux store includes methods such as getState(), returning the current state of the store, and dispatch(action), described below.
dispatch
This dispatches an action which is the only way to update the state:
const action = {
  type: 'DELETE',
  payload: {
    user_id: 1
  }
};
store.dispatch(action)
Actions
Actions are plain JavaScript objects that usually consists of a payload and always a type. These actions represent an intent to change the state of the store. Preferably, the only way to change the state of the store, is through actions.
const action = {
  type: 'ADD',
  payload: {
    name: 'Ola Normann',
    age: 18,
    sex: 'Male'
  }
};
Reducers
Reducers are the pure functions we mentioned earlier. They know what to do with an action and its payload. They take the current state and an action and returns a new state.
MobX
REST

Representational State Transfer
Most, if not all, large popular websites will rely upon some form of REST API in order to deliver some content or functionality to their users. We can communicate with REST APIs using HTTP requests, much like you’d do to navigate to a website or load an image. We can do HTTP requests to certain API urls and these urls would then return the information we required, or we could push data to an API url in order to change some data in a database.
APIs have become ubiquitous components of software infrastructures. In short, an API defines how a client can load data from a server.
REST is an architectural style, or design pattern, for APIs. The whole purpose is to provide standards between computer systems on the web, making it easier for systems to communicate with each other.
For example when a RESTful API is called, the server will transfer to the client a representation of the state of the requested resource.
When a developer calls Instagram API to fetch a specific user (the resource), the API will return the state of that user, including their name, the number of posts that user posted on Instagram so far, how many followers they have, and more.
The representation of the state can be in a JSON format, and probably for most APIs this is indeed the case. It can also be in XML or HTML format.
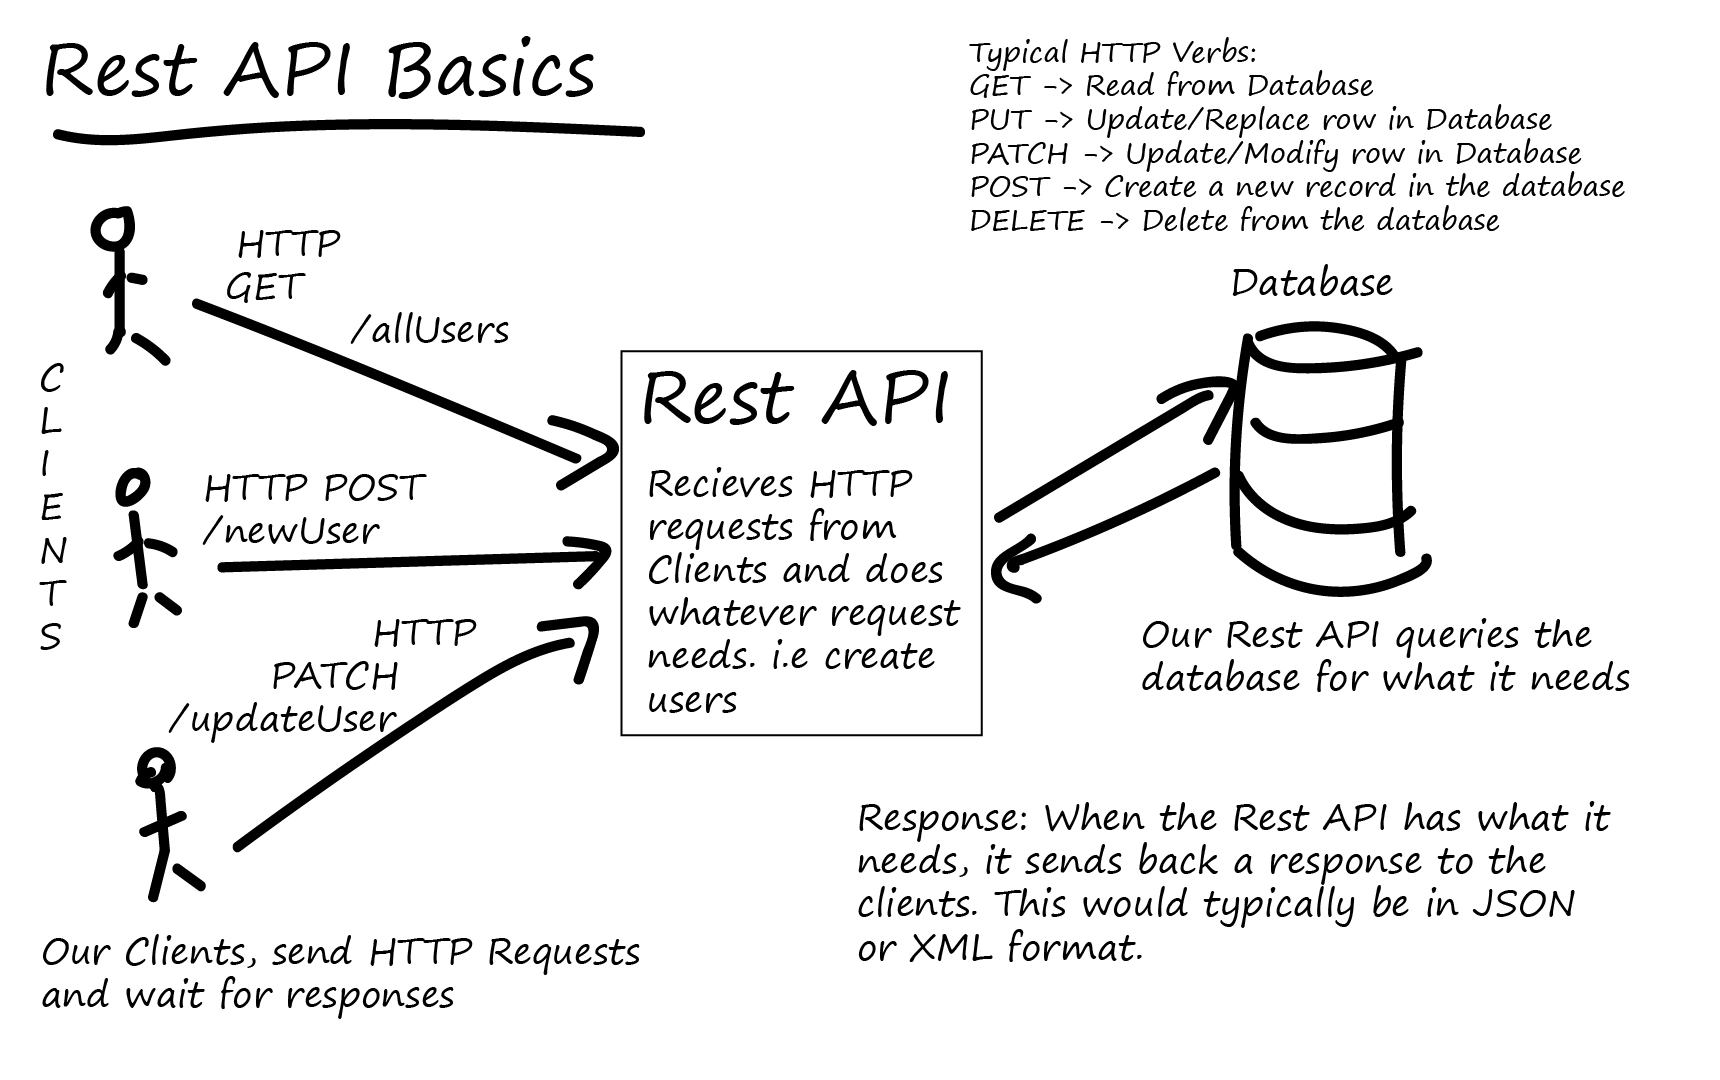
What the server does when you, the client, call one of its APIs depends on 2 things that you need to provide to the server:
- An identifier for the resource you are interested in. This is the URL for the resource, also known as the endpoint. In fact, URL stands for Uniform Resource Locator.
- The operation you want the server to perform on that resource, in the form of an HTTP method, or verb. The common HTTP methods are GET, POST, PUT, and DELETE.
Some sites like Facebook and Twitter actually expose some of these APIs to outside developers to build their own tools and systems. The Instagram API allows your applications to retrieve user accounts, photos, tags and more! For example, here are the possible options for interacting with a user account
User Endpoints:
GET /users/self                  ... Get information about the owner of the access token.
GET /users/user-id               ... Get information about a user.
GET /users/self/media/recent     ... Get the most recent media of the user.
GET /users/user-id/media/recent  ... Get the most recent media of a user.
GET /users/self/media            ... Get the recent media liked by the user.
GET /users/search                ... Search a user by name.
For example, here’s a GET request that you might make to the Instagram API for photo locations from a set of longitude and latitude coordinates for New York City (40.7127° N, 74.0059° W):
GET /v1/locations/search?access_token=ACCESS_TOKEN&lat=40.7127&lng=74.0059
Here’s the JSON response from Instagram:
HTTP/1.1 200 OK

{
 "meta": {
   "code": 200
 },
 "data": [
   {
     "latitude": 40.714198749,
     "id": "93496093",
     "longitude": 74.006001183,
     "name": "John's Pizzeria 278 Bleecker St NY, NY"
   },
   {
     "latitude": 40.7142,
     "id": "46371155",
     "longitude": 74.0064,
     "name": "Thunderpocalypse 2012"
   },
   {
     "latitude": 40.714201754,
     "id": "35932492",
     "longitude": 74.006397137,
     "name": "Avenue of the Americas, New York"
   },
   {
     "latitude": 40.71296389,
     "id": "1023103828",
     "longitude": 74.00388611,
     "name": "Manhattan Municipal Building"
   },
   {
     "latitude": 40.71322,
     "id": "92582758",
     "longitude": 74.003963,
     "name": "Sleepers Filming Location"
   },
   {
     "latitude": 40.716833,
     "id": "97921846",
     "longitude": 74.005833,
     "name": "Atera"
   }
 ]
}
With a REST API, you would typically gather the data by accessing multiple endpoints. In the example, these could be /users/<id> endpoint to fetch the initial user data. Secondly, there’s likely to be a /users/<id>/posts endpoint that returns all the posts for a user. The third endpoint will then be the /users/<id>/followers that returns a list of followers per user. The fetching could be handled as follows:

With REST, you have to make three requests to different endpoints to fetch the required data. You’re also overfetching since the endpoints return additional information that’s not needed.
Overfetching: Downloading superfluous data. Overfetching means that a client downloads more information than is actually required in the app. Imagine for example a screen that needs to display a list of users only with their names. In a REST API, this app would usually hit the /users endpoint and receive a JSON array with user data. This response however might contain more info about the users that are returned, e.g. their birthdays or addresses - information that is useless for the client because it only needs to display the users’ names.
Underfetching and the n+1 problem. Another issue is underfetching and the n+1-requests problem. Underfetching generally means that a specific endpoint doesn’t provide enough of the required information. The client will have to make additional requests to fetch everything it needs. This can escalate to a situation where a client needs to first download a list of elements, but then needs to make one additional request per element to fetch the required data.
As an example, consider the same app would also need to display the last three followers per user. The API provides the additional endpoint /users/<user-id>/followers. In order to be able to display the required information, the app will have to make one request to the /users endpoint and then hit the /users/<user-id>/followers endpoint for each user.
To cope with the need for more flexibility and efficiency a new API was created, namely GraphQL. It solves many of the shortcomings and inefficiencies that developers experience when interacting with REST APIs.
The 6 constraints (Extra)
The REST architectural style describes six constraints. These constraints, applied to the architecture, were originally communicated by Roy Fielding in his doctoral dissertation and defines the basis of RESTful-style. In order for an API to be RESTful, it has to adhere to the following 6 constraints:
-
Uniform interface. The uniform interface constraint defines the interface between clients and servers. It simplifies and decouples the architecture, which enables each part to evolve independently. The four guiding principles of the uniform interface are:
-
Resource-Based. Individual resources are identified in requests using URIs as resource identifiers. The resources themselves are conceptually separate from the representations that are returned to the client. For example, the server does not send its database, but rather, some HTML, XML or JSON that represents some database records expressed, for instance, in Finnish and encoded in UTF-8, depending on the details of the request and the server implementation.
-
Manipulation of Resources Through Representations. When a client holds a representation of a resource, including any metadata attached, it has enough information to modify or delete the resource on the server, provided it has permission to do so.
-
Self-descriptive Messages. Each message includes enough information to describe how to process the message. For example, which parser to invoke may be specified by an Internet media type (previously known as a MIME type). Responses also explicitly indicate their cache-ability.
-
Hypermedia as the Engine of Application State (HATEOAS). by application we mean the web application that the server is running. By hypermedia we refer to the hyperlinks, or simply links, that the server can include in the response. The whole sentence means that the server can inform the client, in a response, of the ways to change the state of the web application. If the client asked for a specific user, the server can provide not only the state of that user but also information about how to change the state of the user, for example how to update the user’s name or how to delete the user. It is easy to think about the way it’s done by thinking about a server returning a response in HTML format to a browser (which is the client). The HTML will include tags with links (this is the hypermedia part) to another web page where the user can be updated (for example a link to a ‘profile settings’ page). To put all of this in perspective, most web pages do implement hypermedia as the engine of application state, but the most common web APIs do not adhere to this constraint. If you wish to further understand this concept the following YouTube video is highly recommended.
The result of the uniform interface is that requests from different clients look the same, whether the client is a chrome browser, a linux server, a python script, an android app or anything else.
-
-
Client — server separation. This essentially means that client application and server application MUST be able to evolve separately without any dependency on each other. A client should know only resource URIs and that’s all. Today, this is normal practice in web development so nothing fancy is required from your side. Keep it simple.
Servers and clients may also be replaced and developed independently, as long as the interface between them is not altered.
-
Stateless. Make all client-server interaction stateless. Server will not store anything about latest HTTP request client made. It will treat each and every request as new. No session, no history.
If client application needs to be a stateful application for the end user, where user logs in once and do other authorized operations thereafter, then each request from the client should contain all the information necessary to service the request – including authentication and authorization details.
No client context shall be stored on the server between requests. The client is responsible for managing the state of the application.
-
Layered system. REST allows you to use a layered system architecture where you deploy the APIs on server A, and store data on server B and authenticate requests in Server C, for example. A client cannot ordinarily tell whether it is connected directly to the end server, or to an intermediary along the way.
-
Cacheable. In REST, caching shall be applied to resources when applicable and then these resources MUST declare themselves cacheable. Caching can be implemented on the server or client side.
Well-managed caching partially or completely eliminates some client-server interactions, further improving scalability and performance.
-
Code-on-demand (optional).
Most of the time you will be sending the static representations of resources in form of XML or JSON. But when you need to, you are free to return executable code to support a part of your application e.g. clients may call your API to get a UI widget rendering code. It is permitted.
All above constraints help you build a truly RESTful API and you should follow them. Still, at times you may find yourself violating one or two constraints. Do not worry, you are still making a RESTful API – but not “truly RESTful”.
Examples, documents and tutorials
There are many tutorials for how to connect your React Application to a REST API. See for an example:
GraphQL
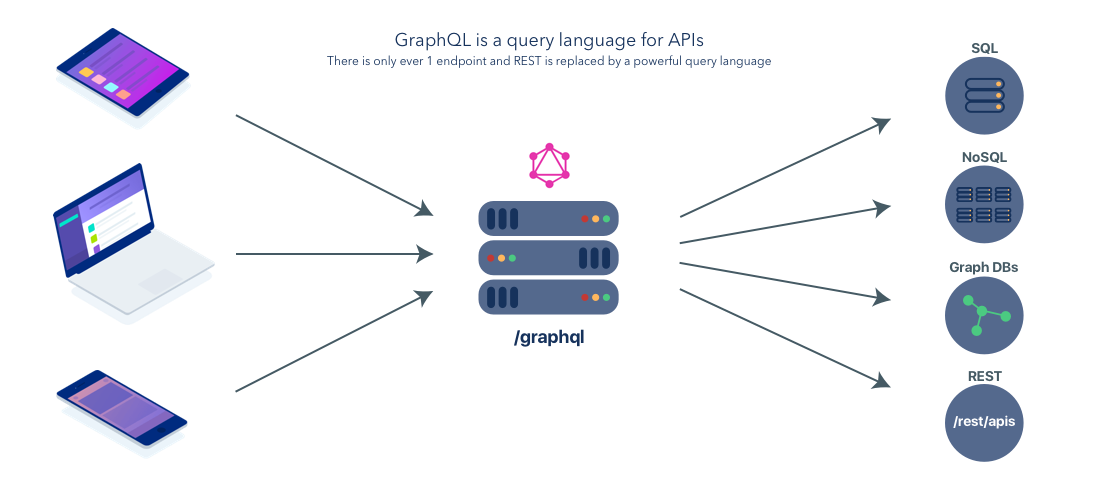
GraphQL is a new alternative to the traditionally used REST, but it could also used together with REST endpoints. GraphQL is based on the idea of having one smart endpoint, as opposed to multiple dumb endpoints as is the case with REST.
It does not come without its weaknesses, so read up and make an educated decision on what to choose for your application. GraphQL lives in the layer between the frontend clients and the databases. It enables apps to get specific data from one, or multiple, databases without specifically having to set up a dedicated endpoint for that purpose. You can ask very specifically for only the data you need to use. By doing this you avoid fetching of redundant data, and set up of redundant endpoints.
A GraphQL service is created by defining types and fields on those types, then providing functions for each field on each type. For example, a GraphQL service that tells us who the logged in user is (me) as well as that user's name might look something like this:
type Query {
  me: User
}

type User {
  id: ID
  name: String
}
Along with functions for each field on each type:
function Query_me(request) {
  return request.auth.user;
}

function User_name(user) {
  return user.getName();
}
Once a GraphQL service is running (typically at a URL on a web service), it can be sent GraphQL queries to validate and execute. A received query is first checked to ensure it only refers to the types and fields defined, then runs the provided functions to produce a result.
For example the query:
{
  me {
    name
  }
}
Could produce the JSON result:
{
  "me": {
    "name": "Luke Skywalker"
  }
}
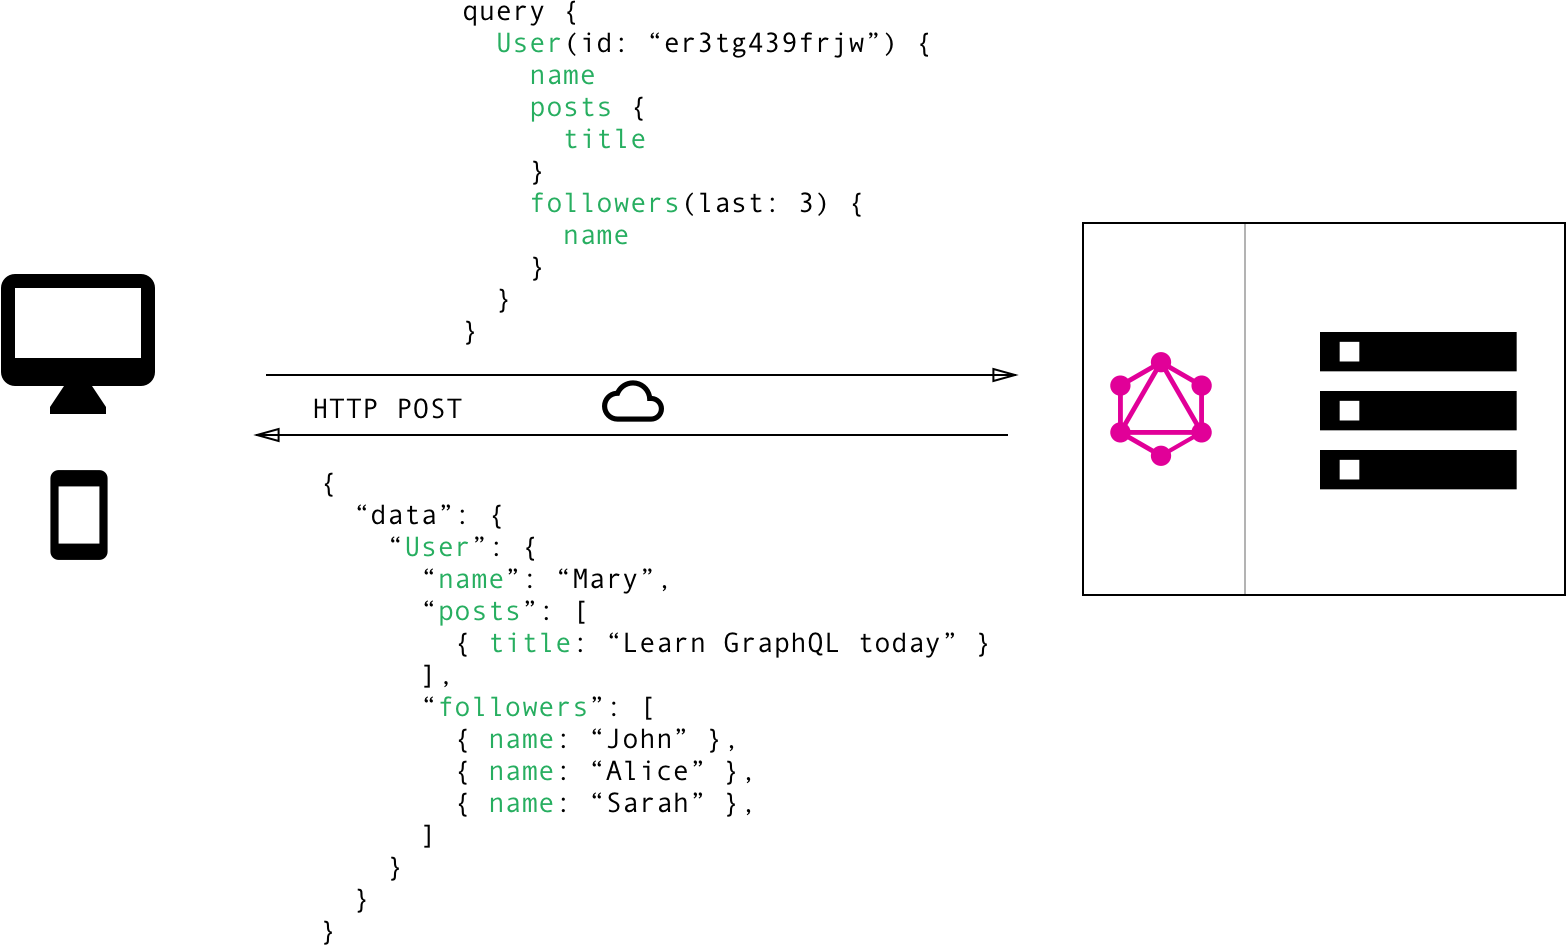
Remember with REST, you had to make three requests to different endpoints to fetch the required data. In GraphQL on the other hand, you’d simply send a single query to the GraphQL server that includes the concrete data requirements. The server then responds with a JSON object where these requirements are fulfilled.
 )
)
Examples and guides
Git
This will not be an introduction to how to use Git, as you should have been introduced to Git in a plethora of previous subjects including but not limited to: IT2805 - Web Technologies, IT1901 - Informatics, Project I, TDT4180 - Human-Computer Interaction or TDT4140 - Software Engineering. Instead we will give some common practices, suggestions for maintaining a good workflow. If you are looking for an introduction to Git, the series by Atlassin is very good. For a more brief approach see git - the simple guide.
Setting up GitHub / GitLab
- Add a good gitignore file.
-
Create a new branch called
devand set this as the default branch. Restrict access so nobody accidentaly pushes directly intomasterordev. These settings can normally be found under Settings > Repository.
-
Structure project into issues and use GitLabs own issue board, or an external Kanban service. Assign team members to various issues.
Local workflow
A Git Workflow is a recipe or recommendation for how to use Git to accomplish work in a consistent and productive manner.
Git offers a lot of flexibility in how users manage changes. Given Git's focus on flexibility, there is no standardized process on how to interact with Git. When working with a team on a Git managed project, it’s important to make sure the team is all in agreement on how the flow of changes will be applied. To ensure the team is on the same page, an agreed upon Git workflow should be developed or selected. As you read through, remember that these workflows are designed to be guidelines rather than concrete rules. For a more in depth view of different workflows in Git see here.
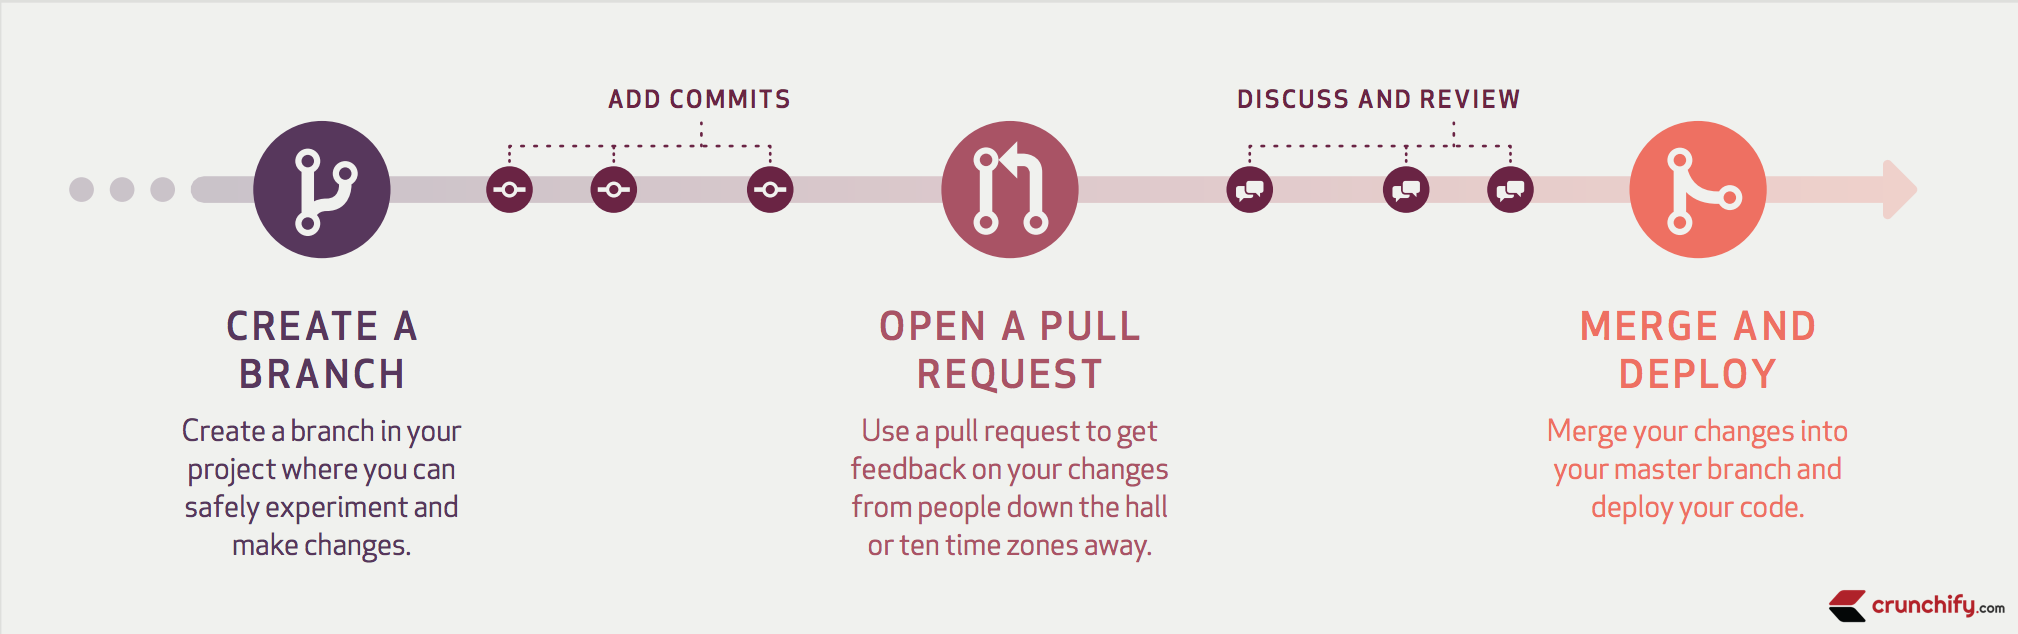
-
Create a branch
git branch -b branchName -
Stage changes locally
git add ...Where ... represents each file you are adding to your commit. Tip: you can use
git add .to add all changed files in the current directory and subdirectories. -
Commit changes
git commit -m "commit message" -
Push branch to repository
git push -u origin branchName -
Open a pull request / merge request in GitLab / GitHub
a) A coworker adds a review. Either approves it, or requests changes.
b) If coworker requests changes, add commits and update request.
Tip: If you have problems solving an issue your coworker can easilly check out your branch after it is pushed, and commit to it. This can be done using
git checkout -b branchName origin/branchNamec) If changes has been requested in step 4b, go to step 4a, else continue.
-
Merge and Deploy
Note: Make sure to actually perform the code review!. See Why code reviews matter (and actually save time!) or The Importance of Code Reviews for plenty of reasons why you should really do the code reviews properly.
Branches
-
Choose short and descriptive names:
# good $ git checkout -b oauth-migration # bad - too vague $ git checkout -b login_fix -
Identifiers from corresponding tickets in an external service (eg. a GitHub issue) are also good candidates for use in branch names. For example:
# GitHub issue #15 $ git checkout -b issue-15 -
Use hyphens to separate words.
-
When several people are working on the same feature, it might be convenient to have personal feature branches and a team-wide feature branch. Use the following naming convention:
$ git checkout -b feature-a/master # team-wide branch
$ git checkout -b feature-a/maria  # Maria's personal branch
$ git checkout -b feature-a/nick   # Nick's personal branch
Merge at will the personal branches to the team-wide branch (see "Merging"). Eventually, the team-wide branch will be merged to "master".
-
Delete your branch from the upstream repository after it's merged, unless there is a specific reason not to.
Tip: Use the following command while being on "master", to list merged branches:
$ git branch --merged | grep -v "\*"
Commits
-
Each commit should be a single logical change. Don't make several logical changes in one commit. For example, if a patch fixes a bug and optimizes the performance of a feature, split it into two separate commits.
Tip: Use
git add -pto interactively stage specific portions of the modified files. -
Don't split a single logical change into several commits. For example, the implementation of a feature and the corresponding tests should be in the same commit.
-
Commit early and often. Small, self-contained commits are easier to understand and revert when something goes wrong.
-
Commits should be ordered logically. For example, if commit X depends on changes done in commit Y, then commit Y should come before commit X.
Note: While working alone on a local branch that has not yet been pushed, it's fine to use commits as temporary snapshots of your work. However, it still holds true that you should apply all of the above before pushing it.
The seven rules of a great Git commit message
If you browse the log of any random Git repository, you will probably find its commit messages are more or less a mess.
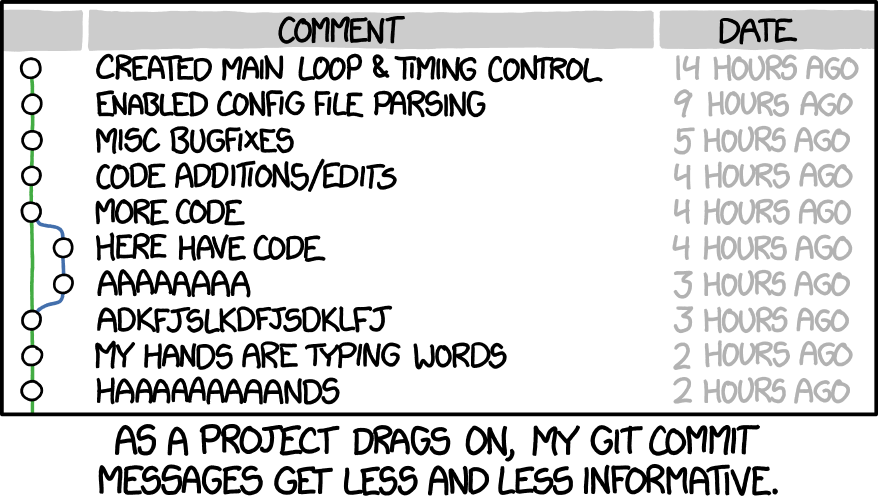 "Merge branch 'asdfasjkfdlas/alkdjf' into sdkjfls-final" (xkcd 1296: Git Commit, CC-BY-NC 2.5 Randall Munroe)
Would it not be cleaner if they looked something like this?
$ git log --oneline -5 --author pwebb --before "Sat Aug 30 2014"

5ba3db6 Fix failing CompositePropertySourceTests
84564a0 Rework @PropertySource early parsing logic
e142fd1 Add tests for ImportSelector meta-data
887815f Update docbook dependency and generate epub
ac8326d Polish mockito usage
Fortunately, there are well-established conventions as to what makes an idiomatic Git commit message.
- Separate subject from body with a blank line
- Limit the subject line to 50 characters
- Capitalize the subject line
- Do not end the subject line with a period
- Use the imperative mood in the subject line
- Wrap the body at 72 characters
- Use the body to explain what and why vs. how
Credits to Chris Beams.
-
Use the editor, not the terminal, when writing a commit message:
# good
$ git commit

# bad
$ git commit -m "Quick fix"
Committing from the terminal encourages a mindset of having to fit everything in a single line which usually results in non-informative, ambiguous commit messages.
-
Also make sure to reference which issue the commit resolves.
Example of a great commit message:
Short (50 chars or fewer) summary of changes

More detailed explanatory text, if necessary. Wrap it to
72 characters. In some contexts, the first
line is treated as the subject of an email and the rest of
the text as the body.  The blank line separating the
summary from the body is critical (unless you omit the body
entirely); tools like rebase can get confused if you run
the two together.

Further paragraphs come after blank lines.

- Bullet points are okay, too

- Use a hyphen or an asterisk for the bullet,
followed by a single space, with blank lines in
between

The pointers to your related resources can serve as a footer
for your commit message. Here is an example that is referencing
issues in a bug tracker:

Resolves: #56, #78
See also: #12, #34
Merging
-
Do not rewrite published history. The repository's history is valuable in its own right and it is very important to be able to tell what actually happened. Altering published history is a common source of problems for anyone working on the project.
-
However, there are cases where rewriting history is legitimate. These are when:
-
You are the only one working on the branch and it is not being reviewed.
-
You want to tidy up your branch (eg. squash commits) and/or rebase it onto the "master" in order to merge it later.
That said, never rewrite the history of the "master" branch or any other special branches (ie. used by production or CI servers).
-
-
Keep the history clean and simple. Just before you merge your branch:
-
Make sure it conforms to the style guide and perform any needed actions if it doesn't (squash/reorder commits, reword messages etc.)
-
Rebase it onto the branch it's going to be merged to:
[my-branch] $ git fetch
[my-branch] $ git rebase origin/master
# then merge
This results in a branch that can be applied directly to the end of the "master" branch and results in a very simple history.
(Note: This strategy is better suited for projects with short-running branches. Otherwise it might be better to occassionally merge the "master" branch instead of rebasing onto it.)
-
-
If your branch includes more than one commit, do not merge with a fast-forward:
# good - ensures that a merge commit is created
$ git merge --no-ff my-branch

# bad
$ git merge my-branch
Misc.
-
Be consistent. This is related to the workflow but also expands to things like commit messages, branch names and tags. Having a consistent style throughout the repository makes it easy to understand what is going on by looking at the log, a commit message etc.
-
Test before you push. Do not push half-done work.
-
Use annotated tags for marking releases or other important points in the history. Prefer lightweight tags for personal use, such as to bookmark commits for future reference.
-
Keep your repositories at a good shape by performing maintenance tasks occasionally:
Kanban
Project managment is one of those dreaded tasks, that just consumes time, and nobody wants to do it. While this task is managble by using GitLab/GitHub's built in issue board, the process can be made less painful by deploying other services.
For an in-depth discussion on what Kanban is, you can check out our detailed breakdown on this workflow methodology here. In brief, Kanban is a project management and workflow method that allows you to minimize multitasking, streamline your work in progress efficiency, and improve the speed and quality of the work your collaborative and self-managing team produces. Ideally a great Kanban tool provides your team with these functionalities:
- The Kanban board – organize your cards with work-in-progress limits, swimlanes, sub-columns, “to-do”, “in progress” and “done” column categories, tasks with checklists, attachments, multiple members and time tracking.
- Kanban Cards – assign tasks with checklists and attachments, offers different views, the ability to link tasks, add task hierarchy to help define cards within cards and assign to resources, and provides Kanban card templates.
- Analytics/reports – pull and create reports.
- Automation/business rules/IFTTT – customize the workflow to suit your environment.
- Integrations – whether the tool integrates easily with other project management or development tools.
The most well known Kanban tool is trello, but here we will advocate for a different service: ZenHub.
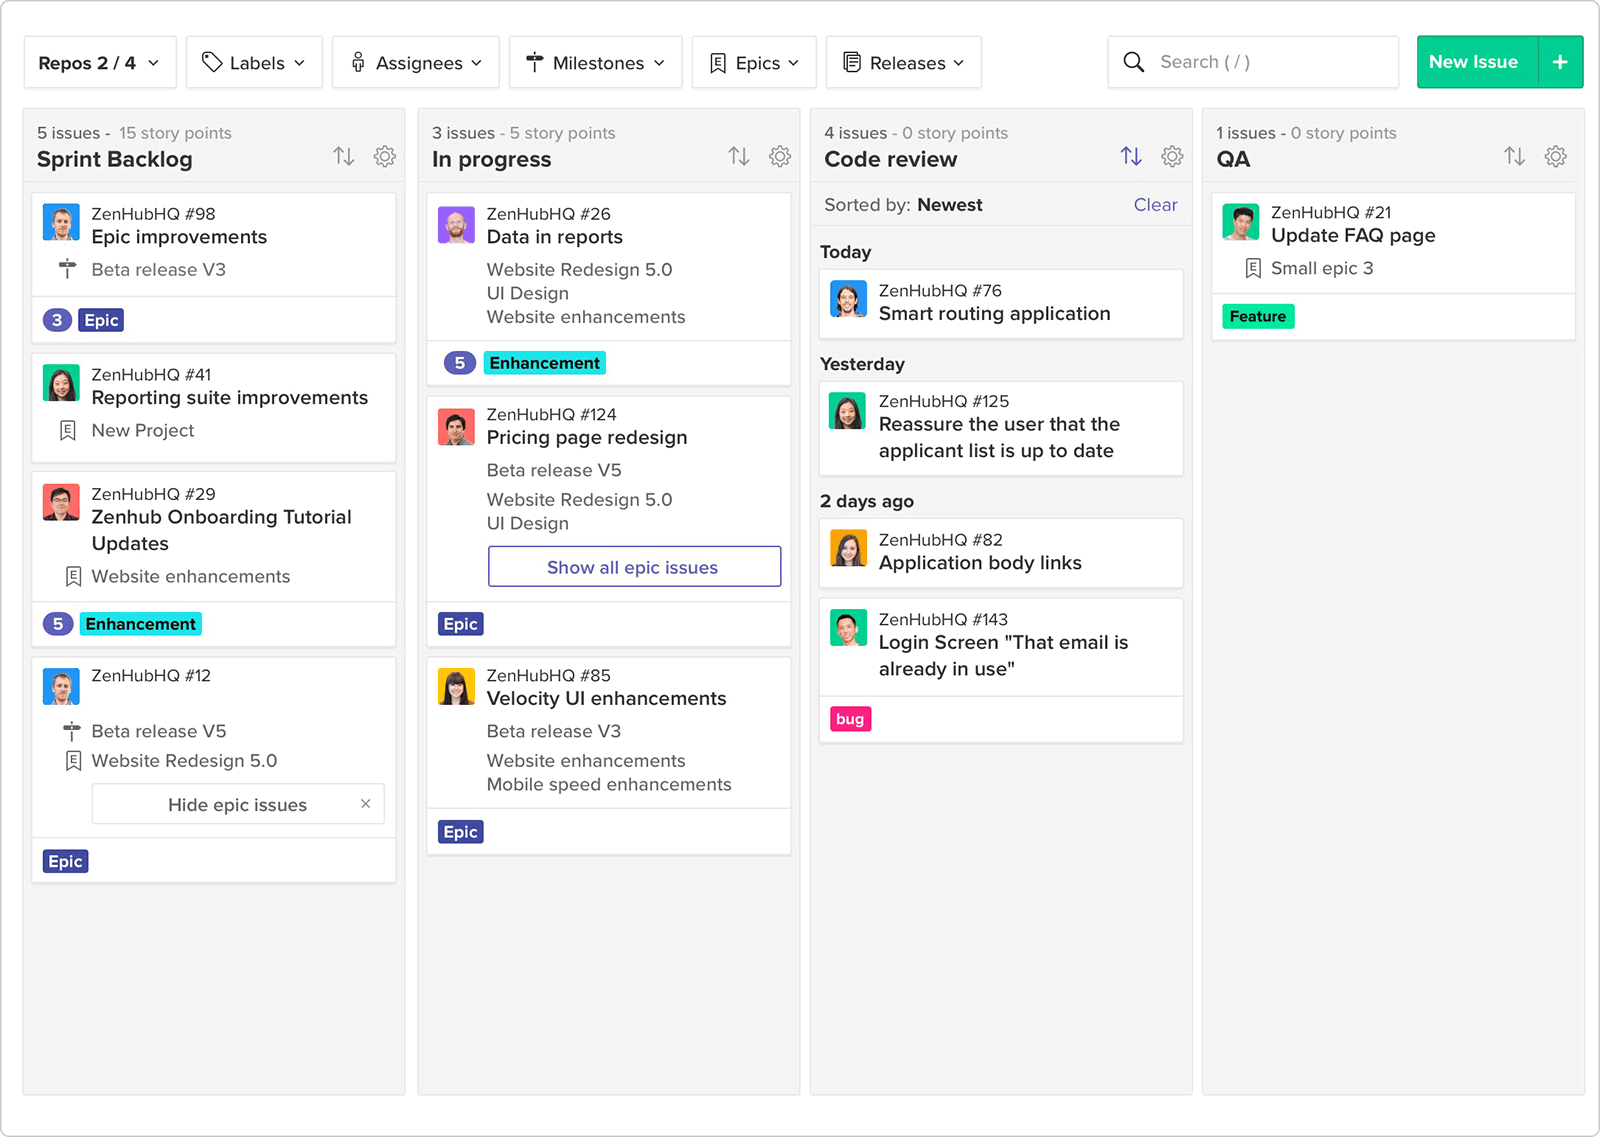
What differentiates ZenHub is that it’s designed to work in a GitHub environment and as such it is promoted as a way for teams working in GitHub to manage tasks without disrupting their workflow. Overall, ZenHub is a user-friendly and workable alternative to Trello, with the functionality to migrate data, automate workflows, and integrate with other tools. If you are using GitHub, ZenHub is the sensible choice—not only is it likely to be familiar to your developers, it theoretically can save your team a lot of time by eliminating the need to jump in and out of GitHub to manage tasks in third party tools.
Perhaps best of all it is free to use for students and open source projects ;)
Testing
More and more web applications are being developed these days. And with each line of code being written, the potential for bugs arises.
Generally speaking, the costs of fixing bugs increase exponentially the later you find them.
The Systems Sciences Institute at IBM found that “the cost to fix an error found after product release was four to five times as much as one uncovered during design, and up to 100 times more than one identified in the maintenance phase”.
And a study by the University of Cambridge found that software bugs cause economic damage of \$312 billion per year worldwide.
That is where web application testing comes in. Web application testing usually consists of multiple steps that ensure that an application is fully functional and runs smoothly and securely. It is an essential part of web development and ensures that an app is running properly before its release.
You can read about different test types in more depth here and here and here. In general, the most important test types for a website are:

- Unit Tests -- Testing of individual functions or classes by supplying input and making sure the output is as expected.
- Integration Tests -- Testing processes or components to behave as expected, including the side effects.
- UI Tests -- (A.K.A Functional Tests) Testing scenarios on the product itself, by controlling the browser or the website, regardless of the internal structure to ensure expected behavior.
Test Tools Types
Test tools can be divided into the following functionalities. Some provide us with only one functionality, and some provide us with a combination.
In order to get a more flexible functionality, it’s common to use a combination of tools even if one can achieve relatively the same.
- Provide a testing structure (Mocha, Jasmine, Jest, Cucumber)
- Provide assertions functions (Chai, Jasmine, Jest, Unexpected)
- Generate, display, and watch test results (Mocha, Jasmine, Jest, Karma
- Generate and compare snapshots of component and data structures to make sure changes from previous runs are intended (Jest, Ava)
- Provide mocks, spies, and stubs (Sinon, Jasmine, enzyme, Jest, testdouble)
- Generate code coverage reports (Istanbul, Jest, Blanket)
- Provide a browser or browser-like environment with a control on their scenarios execution (Protractor, Nightwatch, Phantom, Casper)
Testing structure refers to the organization of your tests. Nowdays, tests are usually organized in a BDD structure that supports behavior-driven development (BDD). It often looks like this:
Testing structure refers to the organization of your tests. Nowdays, tests are usually organized in a BDD structure that supports behavior-driven development (BDD). It can look like this:
describe('calculator', function() {
  // describes a module with nested "describe" functions
  describe('add', function() {
    // specify the expected behavior
    it('should add 2 numbers', function() {
       //Use assertion functions to test the expected behavior
       ...
    })
  })
})
Assertion functions are functions that make sure that tested variables contain the expected value. They usually looks like this, where the most popular are the first two:
// Chai expect (popular)
expect(foo).to.be.a('string')
expect(foo).to.equal('bar')

// Jasmine expect (popular)
expect(foo).toBeString()
expect(foo).toEqual('bar')

// Chai assert
assert.typeOf(foo, 'string')
assert.equal(foo, 'bar')

// Unexpected expect
expect(foo, 'to be a', 'string')
Spies provide us with information about functions- How many times were they called, in what cases, and by whom?
They are used in integration tests to make sure that the side effects of a process are as expected. For example, how many times was a calculation function called during some process?
it('should call method once with the argument 3', () => {

  // create a sinon spy to spy on object.method
  const spy = sinon.spy(object, 'method')

  // call the method with the argument "3"
  object.method(3)

  // make sure the object.method was called once, with the right arguments
  assert(spy.withArgs(3).calledOnce)

})
Stubbing or dubbing (like doubles in movies) replaces selected functions with selected functions to ensure an expected behavior on selected modules.
If we want to ensure user.isValid() will always return true during a test,
where you test a different component, for example, you can do this:
// Sinon
sinon.stub(user, 'isValid').returns(true)

// Jasmine stubs are actually spies with stubbing functionallity
spyOn(user, 'isValid').andReturns(true)
It also works with promises:
it('resolves with the right name', done => {

  // make sure User.fetch "responds" with our own value "David"
  const stub = sinon
    .stub(User.prototype, 'fetch')
    .resolves({ name: 'David' })

  User.fetch()
    .then(user => {
      expect(user.name).toBe('David')
      done()
    })
})
Mocks or Fakes are faking certain modules or behaviors to test different parts of a processes.
Sinon can, for example, fake a server to ensure offline, fast and expected responses when testing a process.
it('returns an object containing all users', done => {

  // create and configure the fake server to replace the native network call
  const server = sinon.createFakeServer()
  server.respondWith('GET', '/users', [
    200,
    { 'Content-Type': 'application/json' },
    '[{ "id": 1, "name": "Gwen" },  { "id": 2, "name": "John" }]'
  ])

  // call a process that includes the network request that we mocked
  Users.all()
    .done(collection => {
      const expectedCollection = [
        { id: 1, name: 'Gwen' },
        { id: 2, name: 'John' }
      ]
      expect(collection.toJSON()).to.eql(expectedCollection)
      done()
    })

  // respond to the request
  server.respond()

  // remove the fake server
  server.restore()
})
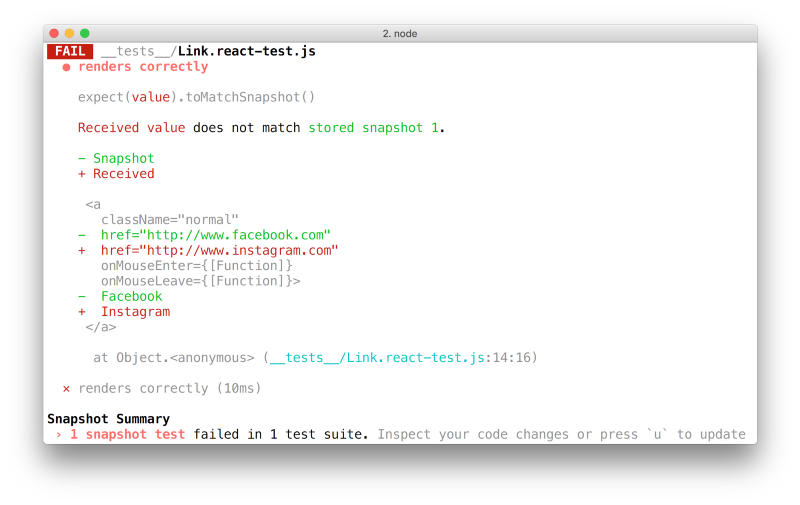
Snapshot Testing is when you compare a data structure to an expected one.
The following example, from the official Jest
documentation,
shows a snapshot test of a certain Link component.
it('renders correctly', () => {

  // create an instance of the Link component with page and child text
  const linkInstance = (
    <Link page="http://www.facebook.com">Facebook</Link>
  )

  // create a data snapshot of the component
  const tree = renderer.create(linkInstance).toJSON()

  // compare the sata to the last snapshot
  expect(tree).toMatchSnapshot()
})
It won’t actually render and take a picture of the component, but it would save its internal data in a separate file like this:
exports[`renders correctly 1`] = `
<a
  className="normal"
  href="http://www.facebook.com"
  onMouseEnter={[Function]}
  onMouseLeave={[Function]}
>
  Facebook
</a>
`;
When the test runs, and the new snapshot is different from the last one, the developer is prompted to agree that the change is intended.
Notice: Snapshots are usually made to compare component representation data but they can also compare other types of data like redux stores and inner structure of different units in the application.
Browser or browser-like environment can be one of the three:
- jsdom —A Pure JavaScript environment that simulates a real browser. It has no UI and it renders nothing- It provides you with window, document, body, location, cookies, selectors and whatever you get when you run your JS inside the browser.
- Headless Browser Environment -- A browser that runs without a UI for the purpose of making the browser respond faster.
- Real Browser Environment -- An actual browser that opens and runs your tests.
How to Test
In the industry it is common to use the same tools for all the test types if possible: The same testing structure and syntax (1), assertion functions (2), result reporting, and watching mechanism (4).
We also suggest creating two different processes. One for running unit and integration tests and another for UI tests. This is because UI tests takes a longer time, especially if tested on different browsers and usually use an external service to provide you with different devices and browsers (this will be discussed later) and can cost money so you would probably prefer to run it much less than the first process. For example: only before a merge of a feature branch.
Unit-testing
Should cover all small pure units of the application- utils, services and helpers. Provide all these units with simple and edge case inputs and make sure their outputs are as expected using the assertion functions (3). Also make sure to use a coverage reporting tool (6) to know what units are covered. Unit tests also tend to be very fast, but does not does not discover errors between components
Unit tests are one of the reasons to use functional programming and pure functions as much as possible
The purer your application is, the easier you can test it.
Integration testing
Old school tests were focused on unit testing and resulted in applications where many small parts are working but the processes as a whole keeps on failing.
Integration tests (including snapshots), on the other hand, can detect many unexpected failures where you fix one thing and break the other.
It is also important to remember that in the real world, for the reasons of imperfect design and the widespread use of black boxes, not all units are pure and not all units are testable- Some units can be tested only as part of a bigger process.
Integration tests should cover important cross-module processes. Comparing to unit tests, you would probably use spies (5) to ensure expected side effects instead of just asserting the output and stubs (5) to mock and modify the parts of the process that are not in the specific test.
Also, as opposed to unit tests, a browser or browser-like environment (7)
could help with processes that are dependent on the window and when part of
the process is to render certain components or interact with them.
Usually cypress [https://www.cypress.io/] is used for integration tests in the course.
Component snapshot tests (4) fall into this category as well. They provide us with a way to test how processes affect selected components without actually render them or using a browser or browser-like environment.
UI-testing
Sometimes the quick and effective unit and integration tests are not enough.
UI tests are always running inside a browser or browser-like environment (7) that were discussed earlier.
They simulate user behavior on these environments (clicking, typing, scrolling etc...) and make sure these scenarios actually work from the point of view of an end user.
It is important to remember that these tests are the hardest to set up. Imagine yourself creating an environment to run a test on different machines, devices, browser types and versions. This is why there are many services that provide this service for you. And even more can be found here.
Glossary
An alphabetical list of common acronyms.
- AngularJs
- Open-source web application framework.
- Apache
- Widely-used free and open-source web server software.
- API
- Application programming interface. In short, an API defines how a client can load data from a server.
- AJAX
- Asynchronous JavaScript and XML. A web browser development feature that allows web pages to be more interactive and dynamic such that content can update without requiring manual page reloads. The “X” is a red herring, these days it’s more common to use JSON than XML.
- Back End
- All of the behind-the-scenes digital operations that it takes to keep the front end of a website running, such as the coding, style, and plugins.
- CMS
- “Content Management System.” The program that you use to create and maintain your website’s content.
- Code coverage
- An analysis method that determines which parts of the software have been executed (covered) by the test case suite and which parts have not been executed and therefore may require additional attention.
- CSS
- “Cascading Style Sheet.” Code that tells browsers how to display a webpage for the end user. This programming formats fonts, colors, and other visual elements.
- Django
- An open-source web framework written in Python.
- Favicon
- Short for “favorite icon,” it’s the icon that appears in your website’s browser tab.
- Front end developer
- A developer who focuses mainly on the part of the application that runs in the browser.
- Full stack developer
- A developer that can get a website live on the internet all on their own. Requires the use of many technologies, including a database, operating system configuration (OS), server configuration, a server framework, HTML, CSS and JavaScript.
- Git
- A distributed source control system
- GUI
- Graphical User Interface.
- HTML
- “Hypertext Markup Language.” The language used to specify the content of web pages
- iOS
- A mobile operating system created and developed by Apple for Apple hardware. It presently powers many of their mobile devices, including the iPhone, iPad and iPod touch.
- JavaScript
- A programming language most commonly used for client-side web browser based applications to build interactive and dynamic web page content.
- jQuery
- A cross-browser JavaScript library designed to simplify the client-side scripting of HTML.
- JSON
- JavaScript Object Notation. A lightweight way to move data for web applications. It’s intended as a more efficient alternative to XML when the sophistication of XML is not needed.
- MongoDB
- A cross-platform, document-oriented database which makes the integration of data in certain types of applications easier and faster. Belongs to the family of NoSQL databases.
- MVC
- Model View Controller. A design pattern for creating a separation of concerns where the user interface is separated from the data and business logic of the application.
- MySQL
- A relational database management system that is a popular choice for use in web applications.
- node.js
- An open-source, cross-platform runtime environment for server-side and networking applications. Node.js applications are written in JavaScript
- SCSS
- Syntactically Awesome Stylesheets. Preprocessing languages that are compiled to CSS
- SQL
- Structured Query Language. A (mostly) standardized syntax for accessing and updating data in a database management system (DBMS). Common SQL databases include MySQL, Postgresql, Microsoft SQL Server (MSSQL) and Oracle.
- Unit Testing
- A method by which individual units of source code are tested to determine if they are fit for use. A unit is the smallest testable part of an application.
- UI
- User Interface. The human interface aspect of a computer application or device. The user interface is what the end user/human sees and uses.
- UX
- User experience design (UX, UXD, UED or XD) is the process of enhancing user satisfaction with a product by improving the usability, accessibility, and pleasure provided in the interaction with the product.
- XML
- eXtensible Markup Language is a markup language much like HTML.